

AEM(Adobe Experience Manager) and Magento Integration are the best in the eCommerce world. Imagine the amazing advantages it offers when combined! This blog has covered the step-by-step guidelines of setting up AEM cloud service and Magento integration.
Before delving into the setup procedure, it is imperative to know about the benefits that enterprises reap from using AEM as a cloud service.
What are the benefits of AEM cloud services?
AEM Cloud Service is a cloud-native solution that offers many benefits for developers, content authors, system administrators, and marketing professionals.
- It is always on operation, always at scale, and always current, thanks to the dynamic architecture and continuous delivery pipeline of AEM as a Cloud Service.
- It allows you to expand your DevOps efforts with Cloud Manager, a tool that provides CI/CD framework, autoscaling, API connectivity, flexible deployment modes, code quality gates, service delivery transparency, and guided updates.
- It enables you to deliver content quickly and efficiently using a built-in Content Delivery Network (CDN) and other network-layer best practices.
- It integrates deeply with the Adobe Experience Cloud to provide better customer experiences with online marketing and web analytics products.
- It comes with tools that help accelerate the migration tasks, such as code refactoring, transfer of content, and more.
AEM Commerce as a Cloud Service
After the launch of AEM Commerce as a cloud service, Adobe recommends to integrate ecommerce services from Magento or other third-party commerce solutions with AEM.
In the earlier versions of AEM, we had a CIF (Commerce Integration Framework) connector to integrate Magento. But now a CIF add-on is available at the Software Distribution portal. From here we can download the latest version of CIF add-on and the integration is easier than before.
The AEM CIF Core Components project serves as an accelerator to get started with projects using AEM, CIF and Magento. The project contains re-useable Commerce core components which combine server-side rendered AEM components with client-side React commerce components (MPA) for dynamic experiences / data.
Usually, Magento Sandbox URL Integration on local would throw CORS issue for the connection and we have designed the solution for the same.
Why AEM Cloud Service and Magento Integration with CIF is needed?
AEM Cloud Service and Magento Integration with CIF is a powerful solution that enables businesses to create, manage, and deliver engaging digital experiences across multiple channels.
With CIF, AEM Cloud Service can leverage Magento's commerce capabilities to provide seamless and personalized shopping journeys for customers. CIF also simplifies the development and deployment of AEM Cloud Service and Magento projects, reducing time to market and operational costs.
By integrating AEM and Magento with CIF, businesses can benefit from the best of both worlds: a robust content management system and a flexible commerce platform.
Setup AEM Commerce as a cloud service with CIF add-on on our store-front ecommerce project
Some of the pre-requisites for the setup are:
– AEM as a cloud service SDK (Software Development Kit)
– Java 11
– Node.js
– NPM (Node package Manager)
- Latest CIF add-on should be downloaded from Adobe Software Distribution Portal. This would be a ZIP file which contains the respective far file as add-ons for our author and publisher environments.
- Download latest AEM as a cloud service SDK.
- Unpack the jar by running java -jar <jar_name> -unpack in the command line to create a quickstart folder (This is just un-pack, hence AEM wouldn’t start)
- Once quickstart folder is created, create install folder under quickstart
- Unzip the package CIF-addon and copy .far file which include (author) in file name for author environment and (publish) in file name for publisher environment.
- Create environment variable named as COMMERCE_ENDPOINT and provide Magento URL provided in sandbox.
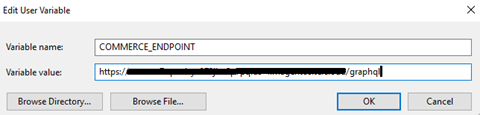
And add the COMMERCE_ENDPOINT into path as %COMMERCE_ENDPOINT%
- Start AEM by running java -jar aem-author-p4502.jar through command line.
- Now we can see commerce under localhost: 4502/aem/start.html
- Setup the proxy server for Magento Endpoint so that the endpoint is available in local for CIF add-on and the CIF core components to bind products into commerce console.
Proxy Setup
Run the following command
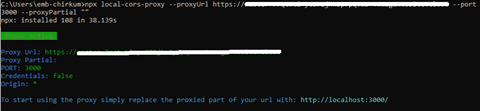
npx local-cors-proxy –proxyUrl <magento_endpoint_url> –port 3000 –proxyPartial “”
When setting up the proxy server, provide your Magento endpoint without “/graphQL”.
Proxy would start stating proxy active and we can hit the URL http://localhost:3000 for Magento Instance
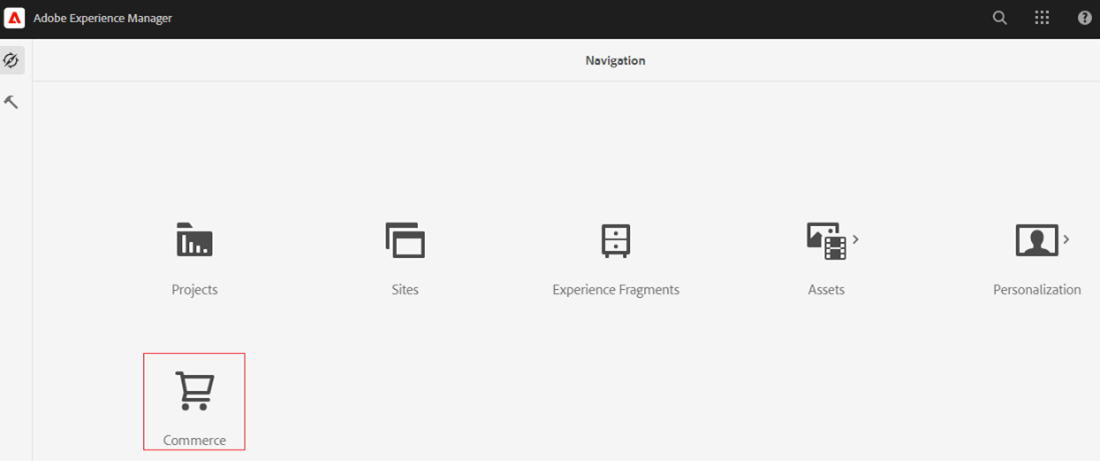
- Once we have done installing Venia-Storefront on AEM localhost
- Goto – AEM Start Page – Tools – Cloud Services – CIF Configuration – Venia
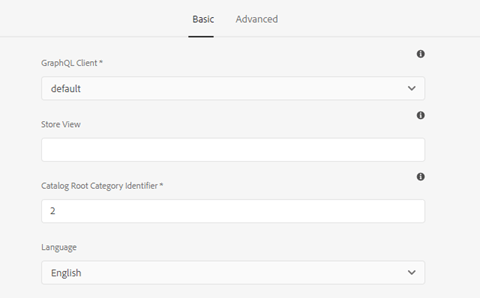
http://localhost:4502/libs/cif/shell/content/configuration.html/conf/venia - Edit the properties of commerce folder and in advance TabProvide the URL -> http://localhost:3000/graphql
- Basic Tab Properties as
- Once after the configuration, we will be able to see the products in commerce console.

This completes the integration between AEM Commerce and Magento Integration setup on local.
What are the special features of AEM as a cloud service?
AEM Cloud Service offers several new features that enhance your productivity, security, scalability, and performance.
- Continuous integration and delivery: It automatically updates your environment with the latest patches and features, ensuring that you always have access to the most current and secure version of AEM.
- Cloud-native architecture: AEM Cloud Service leverages the power of the cloud to provide you with a highly scalable and resilient platform that can handle any traffic volume and demand.
- Flexible authoring: It allows you to create and manage content across multiple channels and devices, using a variety of tools and frameworks that suit your needs and preferences.
- Intelligent optimization: It uses artificial intelligence and machine learning to help you optimize your content and deliver personalized experiences to your customers.
- Unified asset management: It enables you to store, manage, and deliver all your digital assets from a single source of truth, reducing duplication and improving efficiency.
AEM as a Cloud Service versus AEM as a Managed Service
AEM as a Cloud Service and AEM as a Managed Service are two different deployment options for Adobe Experience Manager.
- AEM as a Cloud Service is a cloud-native solution that leverages Adobe's infrastructure and is continuously updated with the newest features and security fixes. It provides high scalability, performance, and reliability, as well as lower operational expenses and simplicity. However, AEM as Cloud Service also comes with some trade-offs, such as limited customization capabilities, and some potential compatibility challenges with third-party integrations.
- AEM as a Managed Service is a hybrid solution that runs on a dedicated cloud environment managed by Adobe, but gives customers more control over their AEM instances. AEM as a Managed Service provides more flexibility, customization, and integration options, as well as access to previous versions of AEM. AEM as a Managed Service also comes with some costs, such as higher operational expenses and complexity, slower updates and upgrades.
It is entirely up to the enterprises to decide which method they want to go with, depending on their business objectives, stage of product cycle, and workflows, among other factors.
How Embitel helps you with the integration of AEM as a cloud service and Magento platforms?
We are an industry expert with 17+ years of experience in digital commerce and digital experience. We cater to all types of businesses ranging from BFSI, IT, retail, F&B, healthcare, and media entertainment. Our customers are based around the globe.
We offer AEM and Magento consulting, implementation, and post integration services. Our support team is available 24/7 to assist our customers.
For additional information and a free demo of our solutions, contact our team at sales@embitel.com
Author Bio

Chiran Kumar is our Associate Director with an impressive record in Application design and Architecture. For over 11.5 years. He has been at the helm of various digital experience and e-commerce projects for leading software organizations.
Chiran has completed his post-graduation in Computer Applications from Al Ameen College, Bangalore. Apart from work… Chiran loves to nurture his passion for bikes and travelling.
