
Most of the modern-day digital applications utilise Application Programming Interfaces (APIs) for interaction with other software systems or modules.
An Application Programming Interface is comparable to an invisible bridge between web applications. APIs also ensure interoperability between the front-end and back-end systems of web applications.

Automated testing of APIs have become an indispensable part of the software development life cycle of ecommerce applications. In this regard, an open-source tool, REST Assured has gained immense popularity in recent times.
In this blog, we explore various aspects of API testing – the need for such testing, and how you can test an API using REST Assured.
Why Perform API Testing When We Have Elaborate GUI Testing Procedures?
For years software testers have relied on good old User Interface (UI) based testing and used tools like Selenium. However, GUI (Graphical User Interface) testing is more suitable for evaluating webpage elements. An example is testing how quickly and accurately a pop-up message appears on loading a webpage.
API level testing offers a host of benefits when compared to GUI testing, as indicated below:
- Testing at the level of Application Programming Interface is estimated to save considerable amount of time as compared to a conventional UI Testing routine. Here is a comparison of the time taken for API testing vs GUI testing when parallelly executed (Source of information: qasource.com)
3,000 API tests performed in 50 minutes
3,000 GUI tests performed in 30 hours
- API level testing is critical to validate the build strength of the web application.
- API level testing helps in unearthing critical bugs or underlying vulnerabilities in the application, early on, rather than discovering them right before the release (as is the case with GUI testing). Thus, API testing can help you fix bugs before they delay your software release.
- Another advantage of testing Application Programming Interfaceis that it is highly cost and resource effective. API testing entails less code usage for test automation as compared to other forms of testing.
Let us not go further into the details of API testing and its benefits and focus on our main topic of discussion.
In the next section we well delve into details of how API testing can be done. We will focus on using the REST Assured tool for performing tests at the API level.
What is REST Assured?
REST Assured is a Java library that provides users with Domain Specific Language (DSL) to create powerful tests for REST APIs in an effective manner.
There are numerous reasons to choose this tool; we are listing a few here:
- Open source, and hence, it is free of any license cost
- Based on Java
- Offers support for all kinds of HTTP methods like POST, GET, PUT, DELETE, OPTIONS, PATCH and HEAD
- Supports the BDD/Gherkin style of writing, which supports clean coding & enhances readability
- Enables easy integration with classic testing & reporting frameworks such as TestNG, JUnit runner and Allure Report
- One can test an application written in any language like Java, .Net, Python, Ruby, etc.
- JSON schema validation can be performed
- Uses GPath to traverse through response, which is an excellent fit for both XML and JSON response traversal
- Supports both path and query parameters
- Makes it easy to test and validate REST services in the Java domain which is usually tough
Now let us look at how we an perform API testing with the help of REST Assured.
How to Execute API Testing Using REST Assured
- Setup
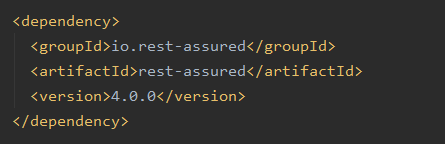
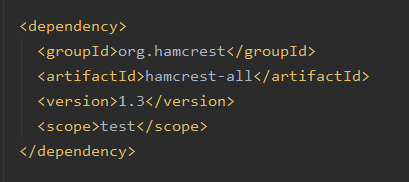
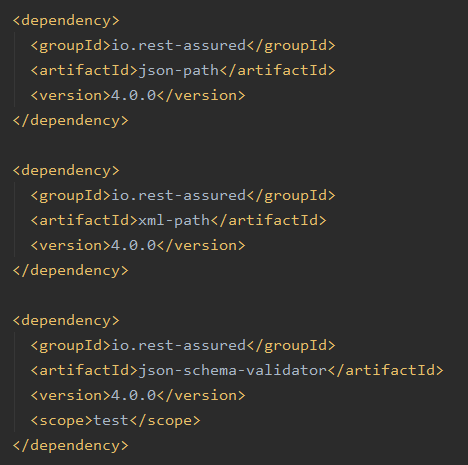
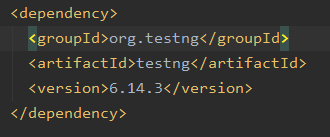
Once the Maven project is created, to be able to use REST Assured in tests, we need to include dependency in Project Object Model (POM) file:
A best practice is to use static imports in class files, so it becomes readable:
import static com.jas.common.ConfigFileReaderUtils.getValueFromEnvironmentFile;
import static io.restassured.RestAssured.given;Config files should be created for the tests, to enhance re-usability, as all tests will access these config files. Here we can instruct REST Assured to access values from environment files, access some values from email server, fetch the client ID/project name, etc.
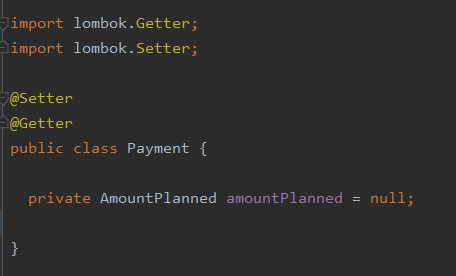
- Plain Old Java Object usage in REST Assured
Create Plain Old Java Objects (POJOs) that represent the API request. POJOs can be used for both serialization and de-serialization.
We can use Lombok to create POJOs (we can utilise @Getter/@Setter annotations to avoid writing boiler plate codes).
Gson is a good option as a Java serialization/deserialization library to convert Java Objects into JSON and back.
REST Assured supports creating objects as request content which can easily be serialized to JSON/XML and sent as request. Hence, instead of passing JSON/XML files directly, we can build objects using POJOs.
Builders are the classes that contain static methods to create a particular Object. Create a builder class where we can build the payload and serialize it using Gson. We can then pass it to request files to generate Response object.
- Response verification
- Verifying the status code
- Print response body
- Verifying content of response
One of the most primary and important validations one can do with REST Assured Response is to validate status code, which can be done using statusCode() method on a Response object. A quick example to get the status code and assert against an expected value is:int statusCode = rawRes.statusCode();
Assert.assertEquals(statusCode, expectedStatusCode, String.format(“Invalid status code: %d”, statusCode));
There is an interface ResponseBody which has a method called prettyprint(), which converts a ResponseBody into a readable String representation. Consider this example where we get the response for an API call which takes some parameters:Response rawRes =
CartsHelper.createCart(
emailId,
currencyCode,
countryCode,
clientId,
“Reserve”);
To print response body, we should use rawRes.prettyPrint(). This gets the response body in readable format. If we use rawRes.toString(), it prints the string representation of the Response object.
{
“id”: ” “,
“version”: 1,
“lastMessageSequenceNumber”: 1
.
.
}
We should create helper files to verify the content of response, as it will make the tests look cleaner and easy to comprehend. One way is to convert the response to string and pass the string content to JsonPath object constructor, as shown below:String responseString = rawRes.asString();
return new JsonPath(responseString);
Consider the response below:
{
“id”: ” “,
“version”: 1,
“lastMessageSequenceNumber”: 1,
“createdAt”: “2020-06-11T18:20:26.461Z”,
“lastModifiedAt”: “2020-06-11T18:20:26.461Z”,
“lastModifiedBy”: {
“clientId”: ” “,
“isPlatformClient”: false
},
“createdBy”: {
“clientId”: ” “,
“isPlatformClient”: false
},
“amountPlanned”: {
“type”: “centPrecision”,
“currencyCode”: “USD”,
“centAmount”: 1000,
“fractionDigits”: 2
}
}
You have to extract the value of centAmount, which can be easily fetched as (assuming “convertResToJson” method gives a JsonPath object):
convertResToJson(rawRes).get(“amountPlanned.centAmount”)
- Set header parameters (single header/multi header) in request
Sometimes webservices need headers to be passed as input to the call, without which the call will not succeed. Hence, we pass single header as shown below:
Response rawRes =
given()
.baseUri(host)
.header(“XYZ”, clientId)
.auth()
.
.
.extract()
.response();
Multiple headers (which get merged by default) or headers containing multiple values can also be passed:
given().header(“header1”, “value1”, “value2”). ..
given().header(“abc”, “1”).header(“xyz”, “2”).
- Set query parameters
The query parameter in a URL comes after the symbol “?”, as shown below:
https://www.google.com/search?q=spice&rlz=1C1GCEU_enIN823IN823&oq=spice&aqs=chrome..69i57j46l2j0l3j46.1191j1j9&sourceid= chrome&ie=UTF-8
Query parameter which is a key-value pair, helps in retrieving the accurate data based on the inputs passed. If multiple parameters are passed, then in the URL it appears separated through “&” sign. The request with query parameter may look like this:
Response rawRes =
given()
.baseUri(host)
.header(“XYZ”, clientId)
.queryParam(“country”, country)
.queryParam(“currency”, currency)
.auth()
.
.
.extract()
.response();
The corresponding endpoint will appear as:
{host}/cart?country={country}¤cy={currency}
We can also set multiple values in query parameters using array list.
- Set path parameters
Path parameter is a part of the URL itself which is used in call to the web service. One of the ways we can use path parameter is by using variable, as in the following example. paymentId can contain any dynamic variable that is passed in the POST HTTP call:
Response rawRes =
given()
.baseUri(host)
.header(“XYZ”, clientId)
.auth()
.contentType(ContentType.JSON)
.body(requestBody)
.and()
.when()
.post(“https://myblog.io/payments/{paymentId}”, paymentId)
.
.
.extract()
.response();
- Set content type of request
The data that is sent to the server in a POST request or the data that is received from the server as GET request most probably has a content-type. The type of body, be it XML, JSON, TEXT or some other format, is defined by the Content-Type header.
If a POST request contains JSON data then the Content-Type header will have a value of application/json or can be specified as enum ContentType.JSON. Similarly, for a POST request containing XML, the Content-Type header value will be application/xml or can be specified as enum ContentType.XML.
Conclusion
REST Assured eases testing of REST APIs and seamlessly integrates JUnit and TestNG. In this blog, we have just provided you an overview of how it can be used for testing. We shall explore the REST Assured tool in detail in our upcoming blogs.
Author Bio:

Jashmine is our QA lead with an impressive record in Software Quality Engineering. For over a decade, Jashmine has been at the helm of various quality control projects for leading software organizations. She has done her graduation in Information Technology from MVJ College of Engineering. When not coding, Jashmine loves to nurture her passion for sports and cooking.
